
|
Main
Menu:
|
|
|
|
Combat Information Center
|
|
|
Training Lecture #4: Assaulting large installations |
|
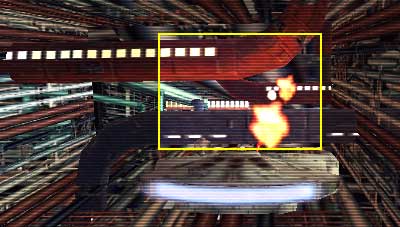
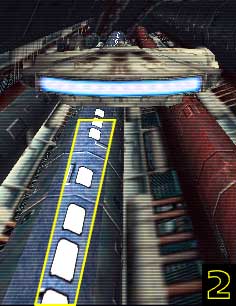
"Greetings, pilots," Erebus said from his position at the lecturn in the Wolfshead Squadron briefing room. "I am here today to brief you on tactics to be used when assaulting a large installation--specifically an installation large enough that you will be required to fly your craft into the installation itself in order to effect its destruction. Obviously, this briefing is brought about by the Alliance victory at Endor. To the best of our knowledge, you won't be needing the information presented in this briefing anytime soon. Hopefully, you will not ever need it. After analysis of the flight films, however, there was apparently a decent amount of tactical knowledge extracted, and Starfighter command wants all of its pilots briefed on this on the outside chance the situation should arise again. "Please bear in mind, the tactics that are going to be presented to you are considered vital secrets and should not be discussed with anyone, even the pilots sitting in this room. If any potential enemy is aware of those tactics, they could very easily design any such structures to combat those tactics." Erebus heard some murmuring from the right-hand of the briefing room, the side the x-wing pilots normally occupied, and watched as some of them bent over, their shoulders bobbing and hands to their faces as they half-heartedly tried to conceal their laughter. The squadron was not accustomed to such seriousness in its briefings, nor to receiving briefings from someone with as low a rank as flight officer. The combination of the two, apparently, was encouraging the heckler in them. From the corner of his vision, Erebus saw Lieutenant Colonel Stauber begin to rise and begin to make his way towards the podium. "Lieutenant Rovardi," Erebus spoke into the microphone, "do you have something to contribute this early into the briefing?" The question brought the laughter to a sudden stop. Lieutenant Rovardi, more commonly called Raiven, stiffened, and the rest of the pilots in the room turned their attention to him. Giving briefings was nothing new to Erebus, and he expected, and usually got, a certain modicum of civility while he doing so. In the absence of that civility being given willfully, Erebus knew how to gain it. Raiven shook his head. "Good. Then I will expect you will treat this briefing with the seriousness with which Starfighter Command intended, Lieutenant Rovardi." Raiven cleared his throat. "Yes, sir." The briefing room erupted with laughter, and Raiven blushed with the realization he had just addressed someone of a lower rank as "sir." "I am certain most of you are wondering why I am standing here giving this briefing instead of, say, the Intelligence or Tactical officers. Prior to my active duty being re-instated, I was a part of the team tasked with analyzing the films from this mission in hopes of extracting valuable tactics. While I did not see that effort to completion, the command staff has decided I am the most qualified to deliver this briefing. That said, we will get started. "This briefing is going to discuss the difficulties faced and the solutions used by General Calrissian, flying the YT-1300 transport Millenium Falcon, and the flight elements that followed him into the Second Death Star, hereafter referred to as the DSII. As often as possible, it will attempt to remain faithful to the time line in which these difficulties were encountered in that mission. By no means does this mean that any installation requiring such an assault will pose the same problems in the same order, but the tactics should remain relatively constant. Stills and one small segment of film will be used to illustrate points. "Upon entering the DSII, General Calrissian was being followed by one x-wing, two a-wings, and one y-wing. Following these were a number of Imperial fighters--two squints and two eyeballs. In order to account for the Imperial fighters following the group, General Calrissian was forced to keep his speed relatively high. At the same time, General Calrissian understood that shields would play an important part in minimizing any damage from minor collisions while maneuvering through the passageways. His L/S settings, therefore, were at 0/100. This was sustainable, in large part, due to the fact that the YT-1300 transport he was piloting had top- and bottom-mounted laser turrets with their own, independent power supply which could adequately take care of any need for lasers he might have. "The initial passages were realtively wide and would have offered a decent amount of room to maneuver were it not for the fact that pipes of various sorts were partially obstructing the path, as in the picture you are now seeing.
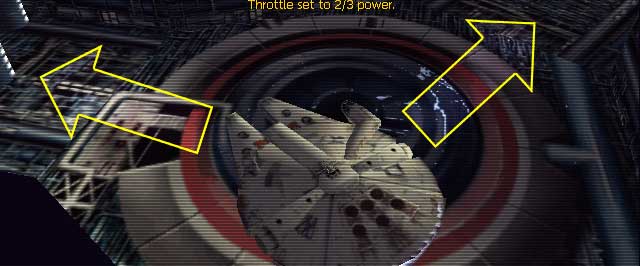
"Obviously, the YT-1300 General Calrissian was piloting was too large to fit through many of the gaps afforded by these pipes. Out of desperation, he used the previously-mentioned laser turrets to blast his way through a large number of them. A small video clip of this should be showing up on your screen right now.
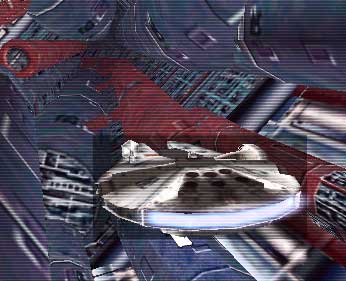
"Of course, most of us don't find ourselves in the seat of a YT-1300 transport all that often. In any future instances, Starfighter Command has arrived at the conclusion that fighters will best keep their L/S settings at 100/0 so they have adequate firepower to destroy obstacles. At the same time, fighters should be able to maneuver through much tighter spaces and will therefore need less laser power than a transport would, which will allow you to shunt excess laser power to shields as needed. "Which leads us to the second problem faced by the craft entering the DSII--maintaining a concrete orientational reference. Had penetrating the core of the DSII been a simple matter of following a single path there, this would not have been a problem. However, at one point in the mission, General Calrissian was forced to choose between two paths, as seen on your screens now.
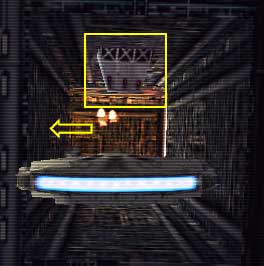
"In this instance, General Calrissian chose the path to the left. This eventually led the Alliance craft to one of the power sources for the main laser on the space station. This was a fortunate turn of events, as it allowed the craft to destroy the power source and disable one of the lenses for the main laser, thus disabling the entire laser itself. This also allowed the group ample room to turn around. In doing so, however, the group had inadvertantly flipped their orientation from what it was previously. In other words, when they returned to the fork, they could very well have turned the wrong direction--a direction which would have led them back out of the DSII and would have, more than likely, resulted in a defeat for our forces at Endor. "Fortunately, General Calrissian had made note of certain 'landmarks' after his initial turn at the fork. There was a small box on the side of the passage he was using to designate 'up.' Upon his return to the fork, he was able to spot this box and adjust his orientation accordingly, thus ensuring that he continued his path towards the DSII's core. The first picture below shows this box as Calrissian first passes it, and the second shows him on his return from destroying the laser power source. The arrow in the second one denotes the direction General Calrissian turned to continue his path towards the DSII core.
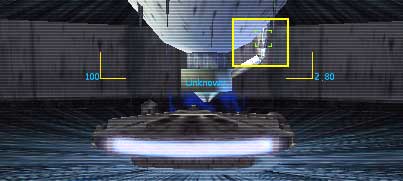
"Believe me, people, maintaining a sense of orientation in tunnels of this sort is a difficult proposition, at best. I cannot stress enough the importance of defining and using landmarks to give you a sense of relative up, down, left, and right. "The third major difficulty presented our craft in this assault was a second type of passage they needed to utilize. These passage were lined with pipes and, while they were fortunately unlike the previous passage we saw which was obstructed by pipes, were extraordinarly narrow. Add to this the fact that the pipes lining them gave them a non-uniform shape, and you have problems. As a matter of fact, in attempting to navigate these passageways, General Calrissian found he needed, at times, to orient his ship a certain way to avoid damage. "Fortunately, from what Starfighter Command can gather, these pipes were most likely used to ferret manpower and equipment within the DSII. Obviously, a machine that large needs ducts through which those resources can pass to effect repairs and address any mechanical problems that might arise. Of course, these would face many of the same problems that General Calrissian did in navigating those pipes, although our pilots had the bad luck of a rather tight schedule forcing them to higher than what we imagine to be the recommended speeds. The point being, there are signs for how to orient your ship that are visible before entering these passageways. These signs became increasingly important as General Calrissian was pushing his ship to faster speeds after the reactor core had been destroyed and attempting to avoid the blast following him. "There were two main markers that General Calrissian made note of. These are pictured below. While it cannot be guaranteed that these will remain constant from installation to installation, there will hopefully be similar markers you can keep an eye out for.
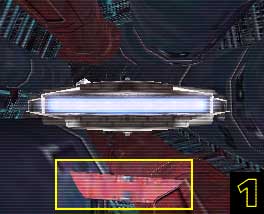
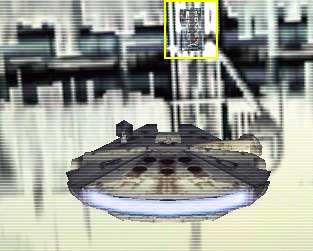
"The image labeled '1' highlights the first type of indicator--a strut running along the relative bottom of the passageway. While it is not evident here, the entire passageway was lined with similar struts. You will note the scant amount of room available on either side of the YT-1300 transport and the distinct lack of possibility for any kind of roll adjustment on its part. Had General Calrissian entered this passage in any way other that with those struts oriented towards the top or bottom of his craft, he would more than likely have been raking the hull of his craft along the pipes. Obviously, you will need to account for the type of craft you are flying. The YT-1300 is much wider than it is tall, so this arrangement worked. A b-wing, however, which is much taller than it is wide, would need to have those struts either along the left or right side of the craft instead of above or below. "The image labeled '2' shows the second kind of indicator--lights running along one of the pipes. Again, Calrissian used this to denote relative down, but you will need to adjust for whatever craft you may be piloting. As well, while this picture shows a passageway with much more room than is available in the other picture, it is still important to maintain this orientation.
"The above picture shows a critical transition point from a relatively roomy passageway with the second kind of indicator (light-lined pipes) to a much smaller passageway with the first kind of indicator (strut-lined pipes). Had General Calrissian not had his ship oriented so that the light-lined pipes were relative down, he would not have been at the proper orientation to enter the upcoming passage. More than likely, this would have resulted in the destruction of his craft and any craft following him. "It should be noted that, by the time he had reached the fork, the Imperial fighters following him had been eliminated. This allowed General Calrissian, at least until the reactor was destroyed, to increase his L/S settings to 100/100 and recharge his shields. If you have no oposition following you, it would be a good idea to take advantage of this as needed. "Finally, we reach the reactor core.
"First and foremost, make sure you didn't come all this way for nothing. In other words, make certain you are targeting the proper components of the reactor. In the picture above, we see that general Calrissian has targeted the power regulator. He would fire four concussion missiles into this, followed by four into the reactor itself. Had he not done both, more than likely the reactor would not have been destroyed. Just make sure you are doing things right--more than likely, you would be flustered by this point and more prone to mistakes even though you are not having to worry about space in which to maneuver. "The final problem facing general Calrissian was getting out. As you can see from the above picture, the room with the reactor core was immense. Once it started to explode, the Alliance craft had little time to escape. Make sure you know your way out at all times.
"In this case, as shown by the picture above, the exit from the reactor core was the same as the entrance to the reactor core. General Calrissian was able to fire off his missiles, turn, and begin heading towards the exit. This actually gave him a little extra time, as he was able to travel towards the exit while his missiles were still en-route to the reactor. "Of course, after exiting the reactor chamber, the Alliance craft still had a decent journey to safety. They were forced to push themselves to the extent of their piloting capabilities, often with L/S set to either 0/75 or 75/0, as the situation demanded, and shunting laser energy to shields and vice versa. Fortunately, they had managed to realize many of the tactics presented here and make their escape. "As I mentioned at the beginning, we hope neither any of you, nor any other New Republic pilot will need to make use of these tactics. Should you, however, need them, at least they are now at your disposal. Finally, it would be remiss to avoid mention of the salvage yard a majority of our pilots make use of to hone their skills. The salvage yard is an excellent way to practice for assaults on this type of installation. Of course, Starfighter Command does not condone this practice. The fact they do not condone it, however, has not stopped them from including a similar mission in the standard simulator packages distributed to the fleet. Make use of this. "I am done. Are there any questions? Lieutenant Rovardi, perhaps?" The room remained silent, although there were a few grins from some of the pilots at Erebus's last remark. None of the members of the squadron had been present at the battle of Endor. They had seen vids and holo-projections of the battle on the news casts shortly afterwards, of course. And they knew that the pilots who had entered the DSII had done an extraordinary job under what had to be difficult conditions. None of them, however, had fully understood the difficulties presented those pilots until this briefing. They sat in awe, amazed that any of them had survived to bring back such footage. Vyper walked towards the lecturn. "We'll take that silence to mean that there are no questions. May I remind you all that this is considered to be extremely sensitive information and is not to leave this room. Dismissed!" (Mail your questions to Erebus) |


|
Random Quote:
|
|
|
"Aren't you a little short for a Storm Trooper?" -- Princess Leia
|
Please read our Privacy Policy.
Last update of this page: 19/05/2008 - 18:13